
DIY: Make Your Own Lingerie- Babydoll
Do you love lingerie? Do you love it so much you would like to make a piece of you own? Well we have written the steps it takes to make a simple but very sexy babydoll design. This will include making your pattern pieces using your own measurements and sewing it all together. Keep reading for all the steps to make you own babydoll. This will not be a very quick DIY but make it into a project and absolutely love the results.
What you will need:
- Sewing machine (Unless you are great at hand sewing, it will just take longer!)
- Scissors
- Fabric-silks, lace, soft jersey knits. (Whatever feels and looks best to you!)
- Matching Thread (Unless you like different, use a different color so it will stand out!)
- Pencil
- Dot paper (if your pattern pieces are small enough, you can use regular paper and tape sheets together)
- Sewing pins
- Closure of your choice (Clips were used for center back closure.)
- Tape measure
- ¼” Elastic- for waist band and straps: The regular elastic was used for the waist and a fancier lace was used for the straps.
- Hip curve ruler, ruler
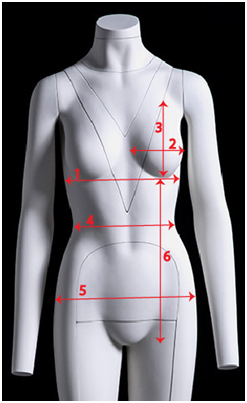
Measurements: (Size M/L will be shown)
- Band: Around your bust--------34”
- Width of cup: Under the arm pit to the middle of the breast--------8”
- Height of cup: Under bust to 4” down from collar bone--------9”
- Waist: add 1”--------33”
- Hips: add 3” (or more if you want is loss and less if you want it tight) --------45”
- Length: Empire line to hem (this measurement is up to you, for where you want the hem to land on your body) --------21”
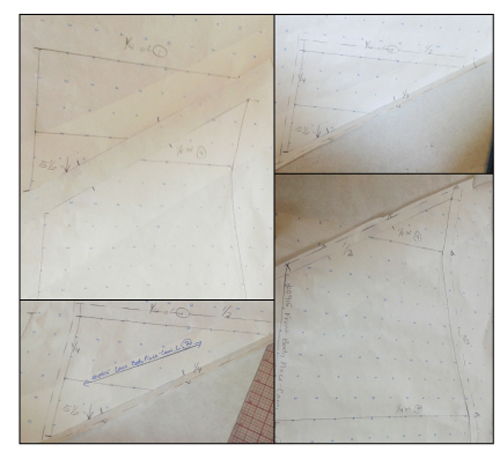
Pattern Pieces:
All of the patterns will be identical, so you will just have to make one side and cut two pieces. To get the left and right sides, when cutting, have the wrong sides of the fabric facing each other. (Make sure you will have a left and a right side, if there is a right and wrong side to the fabric.)
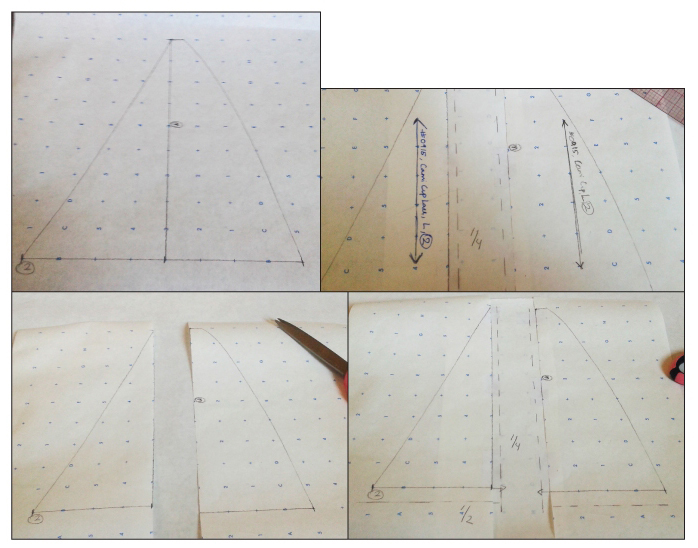
*Making the cups: using your 2 and 3 measurements:
Draw a straight line weft wise using measurement 2; mark the middle of that line. Then warp wise, draw a line up from the middle of 2 line, with 3 measurement. Draw a straight line from the left side of line 2 to the top of line 3.
On the other side draw a slight curved line from the top of line 3 to the right side of line 2. Your cup foundation is done!
*Then cut on line 3, slip the two sides.
*Label each pattern piece.
*Add seam allowance-
1/2” to bottom and on the top
1/4” along line 3-on both pieces.
(for this design, the edges were laser cut; if you want a finished edge, put 1/2”)
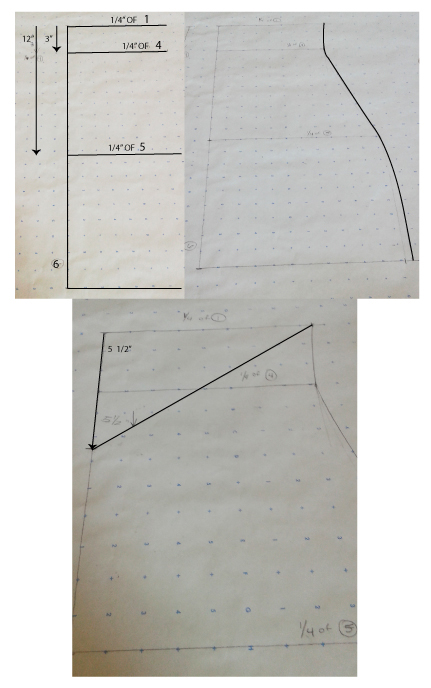
*Making the front bodice: using your 1, 4, 5, 6 measurements:
Draw a line warp wise on the left side of the paper using measurement 6.
From the top- Draw a line weft wise ¼” of measurement 1, weft wise from line 6
3” Down from the top- Draw a line weft wise ¼” of measurement 4, weft wise from line 6
12” Down from the top- Draw a line weft wise ¼” of measurement 5, weft wise from line 6
On the bottom point (hem) of line 6, draw a line weft wise = line 5 measurement.
*Using your curved ruler, match lines 1 to 4 to 5 to hem smoothly.
*Now to separate the lace cutout piece-
Mark 5 ½” down from the top of line 6 and draw a straight line to the end point of line 1- label it A.
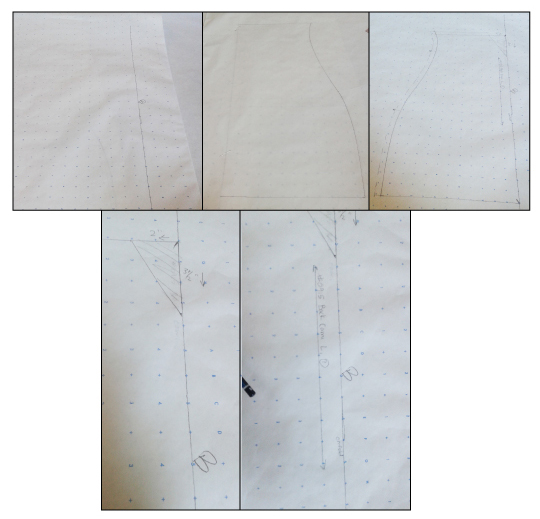
*Making the back bodice: using the front bodice:
On another sheet of dot paper, draw a line warp wise on the right side of the paper= measurement 6
Mark a B on the line.
Flip the paper over; place on top of the front bodice and pin lines 6 together.
Trace line 1, the side curved line and the hem.
Flip paper back over and trace those lines again, so you can see the markings on the correct side of the paper.
Mark points 3 ½” down from the top of line B (center back) and 2” left from the top.
Connect this two points with a straight line.
*Add seam allowance:
1/2” to top and side seam. (If you want a finished hem, add ½” there as well)
Mark this pattern piece as your back piece.
*Finishing the front bodice:
*Now to separate the lace cutout piece-
Cut on line A and slip the two pieces,
Label both pattern pieces, the lace cutout on bodice and the front bodice
*Add seam allowance:
Lace piece: 1/4” on center front and on the joining seam (different from front bodice because it will be scalloped), 1/2” on top (waist)
Front bodice: 1/2” on joining seam and on side seam. (add ½” to hem if you are going to finish the edges.
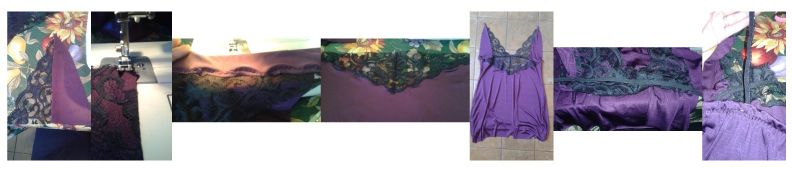
Sewing Pieces Steps:
- Sew the cup contrasting fabric together. ¼”- seam will be down the center on the cup
- Sew the contrasting lace to the front bodice. Sew along the scallops
- Sew the cups to the front bodice. Line the center fronts up and sew ½”
- Sew the front and the back together at the side seams. ½”
- Sew ¼” elastic (this will be measurement 1 – 3”) to the waist, where the cups join the front bodice and for the back, fold the ½” seam allowance to the elastic. (When sewing elastic you must pull on the elastic at all times)
- Sew the closure to the ends of the elastic.
- Sew the strap to the ½” allowance at the top of the cups and on the back (3” away to the side seam)
- If are going to finish your edges, fold ¼” press, fold ¼” and sew all hems.
Good luck!! Wishing you the best and hope you love it! Feel free to comment questions, or share your final results with us!